 I’ve spent 80 percent of my life with my hair in a bun. This all started when I was 3 years old taking my first ballet class and since has occupied most of my life now into my mid 20’s. Funny story actually: it was the day of my first ballet class. Even though I was so young, I still remember that day like it was yesterday. I had butterflies in my stomach, yet I was still very excited! Nonetheless, neither my parents nor I knew the proper ballet attire and etiquette that came along with it. All we knew was that I needed to have those little pink ballet slippers, tights and a leotard, and my hair up with a “net”. Go figure it would be my mom to not look up any information on the essentials of ballet and literally send me to class with a net all over my head like a lunch lady with pins sticking in and out all over the place! I was utterly embarrassed and after ballet was over, the teacher handed me a piece of paper on ‘how to make a ballet bun’. I gave it to my mom, we both giggled, and from that day forward that never happened again. So, when having gotten the opportunity to write this blog, that was the first thought that came to mind and how thrilled I was to be writing on this topic. After that experience, my dad would do my bun with those popular ‘Hairagami” hair clips we had back in the 90’s (Thanks, Dad!).
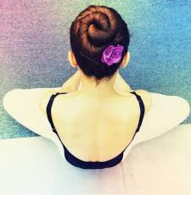
By age 11 I was doing it myself and picking up tips from the older girls along the way. One in ballet could always tell who was serious or not based on the way their bun looked. There would be those flashy do’s or the “door knob-looking” bun, which were both no-nos. I have always been very serious when it came to ballet, so my bun had to be just as serious. By the time I turned 16 or so, I perfected my bun technique and enjoyed the morning ritual of turning, twisting, and sculpting my hair so that it was just right before heading to ballet.
 On average, a dancer’s day is usually around 6-8 hours, including class and many rehearsals. That being said, it is important to have a well-perfected and secure bun that will last the whole day. Not only is a creating a proper bun important, but also the reasons why. It is essential that your hair be done properly because it prevents any distractions that can be caused by a ‘flying’ ponytail during leaps, jumps, and turns. Overall, it is distracting to oneself and others in class if hair is not secure. Secondly, it is proper ballet attire and etiquette as I mentioned briefly above. Not only do ballet buns meet the standard expectation and appearance of ballerinas, they have a functional purpose too. Having hair up in a ballet bun allows the instructor, and dancer, to see the line that is being created by the shoulders, neck, arms, and back, to make the appropriate corrections if necessary. Lastly, often times, dancers get hit in the face with their ponytail during turns, jumps, etc., creating distractions to their spotting and technique.
Here are the method and steps that have worked for me all these years!
Step 1: I like to start by wetting my hair a little bit with water, just to make it easier to work with. If your hair was freshly washed, I would recommend using a texturizing spray to give it some hold and make it more manageable to style.
Step 2: Use a comb or brush to pull hair into a high ponytail. Then, secure with elastic. The perfect height for your bun is at the crown of the back of your head. You should be able to see the top of the bun when you’re facing the mirror straight on. This gives the illusion of a longer neck, which is always what you want in ballet!
Step 3: Twist the ponytail, whichever direction you prefer, into a rope-like shape and pin around the elastic until you reach the end of your ponytail. For the true ballerina bun, u-shaped pins are the best! They are easier to use than regular bobby bins and also hold more hair.
If you have thick hair, I recommend the two-piece bun method so you do not end up with the dreaded doorknob. To get started, separate your hair into two pieces and use one first and the second once first piece is all pinned securely. Just twist and turn one piece in one direction and the second in another and make sure all loose ends of hair are tucked under and pinned tightly.
Step 4: Finish by using just a little bit of hairspray. Not too much though otherwise you get that really stiff wet hair look, which isn’t very pretty! Or, do not use hairspray at all. I prefer not to use hairspray unless it is a performance. It’s ok to have a little bit of ‘whispies’ for class.
Good luck and I hope you enjoyed this entry! For any comments or concerns, please feel free to write below. Thanks!
Author Bio: Melissa Briggs is one of Dance & Company’s instructors; she teaches Ballet 1 Youth on Monday’s 6:30-7:30pm, as well as subs all ballet levels. She also works the front desk on Monday’s, Tuesday’s and Saturday’s, so be sure to say hello and give her a big smile if you are in at any of those times!